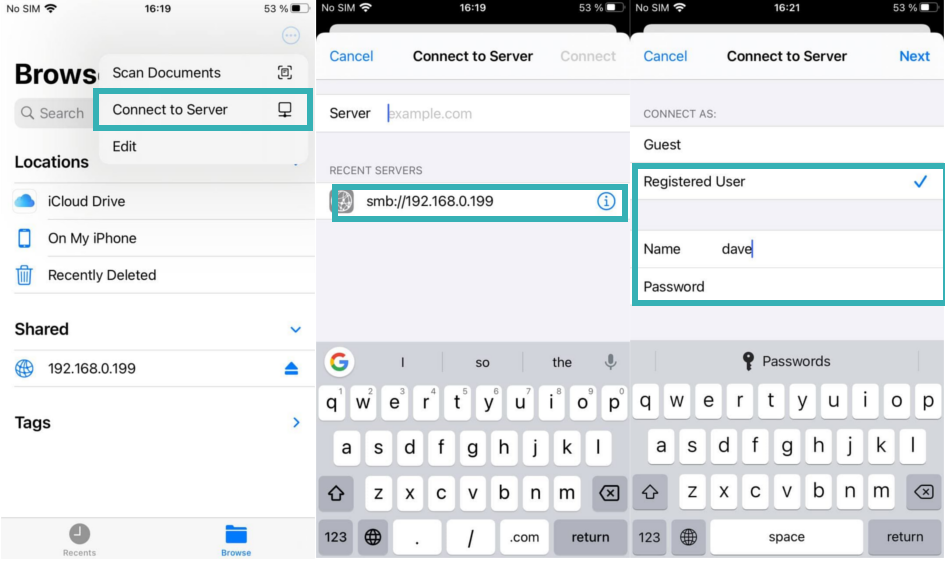
A NAS (Network Attached Storage) drive is a hard disk that’s accessible via a shared local network via WiFi or Ethernet LAN cable. NAS drives have been around and they keep growing in popularity because they are robust, low-power, network accessible storage devices. Synology and QNAP have made a name for themselves as the preferred choice of NAS drives. However, you can also do a DIY NAS device by simply turning an old computer into a fully capable network storage device with open-source software such as OpenNAS. A NAS device uses a variety of network file sharing standards such as File Transfer Protocol (FTP), Server Message Block (SMB), Network File System (NFS), Web Distributed Authoring and Versioning(WebDAV), Apple Filing Protocol (AFP). The most popular is SMB which is widely-supported across iPhone, Mac, Windows, and Linux. Almost every NAS drive supports it too. Your NAS drive already has a number of folders that are accessible from the network. All you have to do is connect to it from your iPhone, iPad, or Mac. The Files app on iOS is what you use to connect to the NAS drive. Step 1: Make sure your iPhone/iPad and NAS drive are both connected to the same network. You should know the IP address of your NAS drive. Step 2: Tap on menu option in the files App » Connect to Server » enter smb://nas-drive-ip-address » Registered user » Enter username and password » Tap on Next. If everything checkouts out, then you should be able to view shared folders on the NAS drive. On the Mac, the same steps are almost the same. Open Finder, go to the menu bar » Connect to server » Enter the NAS drive SMB address such as smb://my-nas-drive-ip » enter username/password and click Done. Let us know if you need any help with transferring files from your NAS drive to using the iOS File app on iPhone and iPad.

